|
Scan2x installed on PC – kiosk mode
Prerequisites
Scan2x software is a Windows WPF application, and requires a PC with the following minimum spec:
•8-core Intel processor or better
•16GB RAM
•500GB SSD hard disk
•1GBit network card
•Touchscreen interface (if software is to be used in touchscreen mode)
•USB ports running USB-2 or better
Apart from the above requirements there are also some software requirements:
For Scan2x Windows (standard installation, not Web Access Server)
•Microsoft .NET Framework 4.8
Required for Scan2x to run. Without it, the application cannot start.
•Microsoft Visual C++ 2015–2022 Redistributables (32-bit & 64-bit)
Required by the IRIS iDRS OCR engine to function correctly.
•Microsoft Message Queuing (MSMQ 3.0)
A Windows feature used by Scan2x for uploading and processing documents reliably.
Other optional components can be installed as needed through the Avantech Support form.
For Scan2x Web Access Server
•IIS with required features enabled
Needed to host the Scan2x web applications.
•Java JDK 11
Required to run Apache Kafka, which manages real-time updates.
•.NET 8 Runtime
Runs the Scan2x server components and background services.
•Apache Kafka
Provides real-time updates so users can immediately see documents being added to queues and track metadata processing.
•AvaProcessStarter Service
Ensures that Scan2x processing consoles restart automatically after a system reboot.
•KafkaServiceManager Service
Manages the Kafka service so that the ScanWebClient can display live document status updates.
•IIS URL Rewrite Module
Handles navigation and routing in the new ScanWebClient.
For users using Scan2x in offline you would need to whitelist the following links:
ØUpdates
Øhttps://connectrest.scan2xonline.com
Øhttps://connectsftp.scan2xonline.com
ØLicencing API
Øhttps://connect.avantech.com.mt
ØAI
Øhttps://s2x-leu2-servicedelegator.scan2xonline.com/
ØScan2x Online Web API
ØScan2x Online - Dashboard
Scan2x for Windows software installation
Scan2x application comes with a complete Windows Installer to guide you through the entire process of installation and initial configuration.
ØTo commence the installation, launch the process by double-clicking the https://connect.avantech.com.mt/updates/Scan2x.zip file and after downloading, Extract all.
ØGo into the extracted folder and double-click on the MSI to open it.
.png)
ØIf you get this prompt, kindly click Run anyway. This software is not harmful.
.png)
ØAfter this follow the Scan2x Setup Wizard by clicking Next.
.png)
.png)
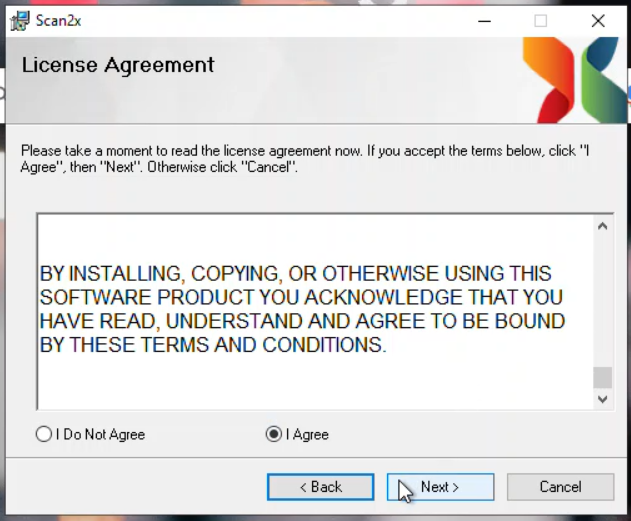
ØReview the licence agreement and press Next to continue.
ØReview the default installation folder. Press the Browse button to edit this and it is suggested to select Everyone. Click Next to continue.
.png)
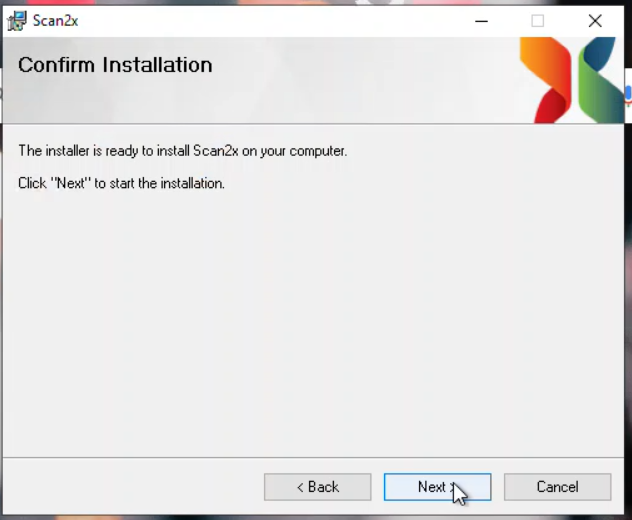
ØInstall by pressing the Next button.

ØThe installation process will show a progress bar as it goes through its steps. The following screen will appear on completion.
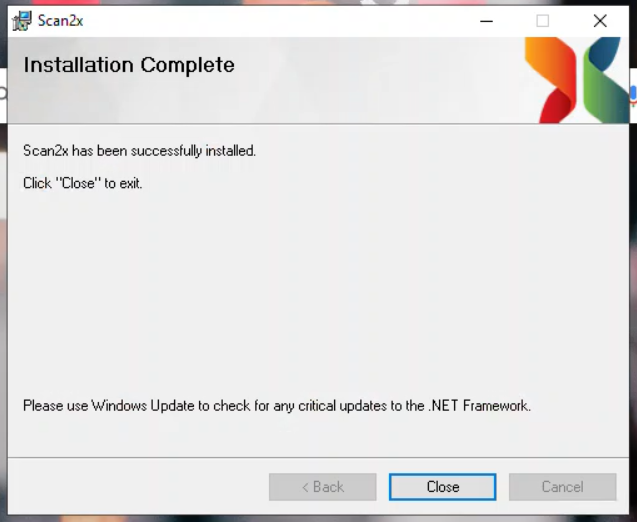
Make sure the .NET Framework is updated. If you do not do this at this stage, you will later be asked by Scan2x to update the .NET Framework when Scan2x will show that updates are available after installation is complete.
Scan2x requires the use of a database engine to maintain its records. In a network environment in which more than one Scan2x unit is envisaged, it makes sense to use a network-wide database server. This is so that all Scan2xs on the network will benefit from centralized settings and activity logging.
For single-Scan2x installations, a local instance running on the Scan2x PC is enough.
We strongly recommend running the SCLWebUpdater.exe as an administrator from the file path C:\Program Files (x86)\Scan2x before opening the Scan2x application. This is to ensure that all the necessary prerequisites (AvaProcessStarter, Microsoft MSMQ and Erlang) install accordingly.
Note: In previous versions, RabbitMQ and MongoDB were required. These are no longer in use. The latest version of Scan2x provides users with the option to remove these components if previously installed. Microsoft MSMQ replaces RabbitMQ, and SQLite replaces MongoDB.
Open the Scan2x application, either the 32-bit or 64-bit application, from the file path C:\Program Files (x86)\Scan2x\.
We recommend that you run the Scan2x application as an administrator - this can be done by highlighting the app, right-clicking and selecting 'Run as administrator', or this can be set by highlighting the app, right-clicking and selecting Properties, go on the Compatibility tab and at the bottom tick the 'Run this program as an administrator' checkbox, click 'Apply', click 'OK' and run the application.
When launches the first time a pop-up with a list of requirements will appear. These requirements are optional to the user and their requirements of Scan2x. The description of each of these requirements has been explained above. The User clicks "Continue".
.png)
When Scan2x launches for the first time it will check for the existence of Microsoft SQL Server on the PC. If an instance is found it will prompt this in the Server dropdown. If an instance is not found, you can click the 'Install Local Instance of Microsoft SQL Server Express Edition' button to install a free version of Microsoft SQL Express. Select this local installation option if installing a trial version or a single-Scan2x system. For installations in which multiple Scan2x units on the same network are required, it is recommended that a central SQL server is used to host the Scan2x database.
Note: if you already have MS SQL Server installed, you can use your existing SQL Server and connect Scan2x to it.
ØInitially the following screen will indicate that the Scan2x system has not been activated and that it hasn’t yet been able to locate the SQL server hosting the configuration database.
ØIf you are connecting the Scan2x windows application to a Scan2x Online tenant, kindly make reference to this tab.
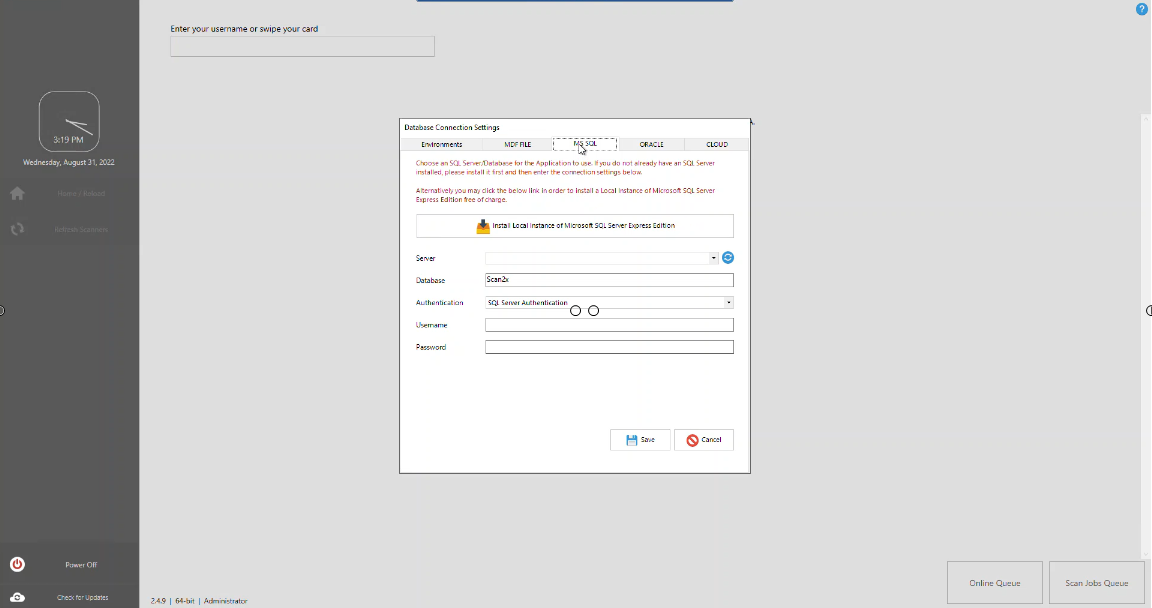
ØSelect the tab for the MS SQL or Oracle database server and enter the relevant details. If you have Microsoft SQL Express installed and you do not see the instance in the Server dropdown, open the SSMS application and copy the Server Name, and paste it in the Server section of Scan2x.
.png)
ØIf you do not have a central database server for multiple Scan2x installations, you can select to download and install a local version of Microsoft SQL Express by clicking button highlighted in the red box, as illustrated in the above screenshot. The software will begin to download SQL Server from the Microsoft site. Microsoft SQL Express is installed as a separate process before continuing with the configuration of Scan2x. For more information, please see the SQL Express & SSMS Installation tab.
If you experience any troubles connecting your SQL Express and SSMS to Scan2x, please see the following FAQ.
Note: if you already have MS SQL Server installed, you can use your existing SQL Server and connect Scan2x to it.
ØOnce SQL Express & SSMS have been installed, you can authenticate by using SQL Server Authentication (we recommend inputting the user 'sa') or Windows Authentication, as seen in the screenshots below.
If you do not see the instance in the Server dropdown, open the SSMS application and copy the Server Name, and paste it in the Server section of Scan2x.
.png)
ØIf Scan2x is not found in the database on the server instance, Scan2x will ask if it can create its database. Click Yes.
.png)
ØThe following screen will then appear. Input your Username, Email and PIN.
.png)
.png)
ØRegister for a new Trial licence or input your existing Licence key and Authentication key.
.png)
ØIf you wish, you can install our Scan2x Start-up Demo Jobs as an introduction to the basic functionality that Scan2x can do.
.png)
ØScan2x may ask you to install updates, as shown in the screenshot below.
.png)
ØOnce the updates have been installed, input your Username and PIN to login.
.png)
ØYou can now get started, use and explore Scan2x.
.png)
|