|
Custom Installation
Installation Requirements
Once the custom option is selected, the next screen will show the requirements which will be installed via the installer.
There is the option to configure a custom IP Address for the ScanWebServer. If this option will be used/ticked, input the custom IP Address and click Apply, then click Next.
.png)
Proxy Setup
If the network uses a proxy, tick the Add proxy to configuration checkbox and input the Proxy Address in the required field and click Apply.
.png)
Database Setup
Insert the Server name, which can be found when logging into SSMS next to the Server Name section.
Select SQL Authentication from the Authentication dropdown.
Insert the credentials (username and password) of the Login 'sa' that was done during the SSMS process. For more information, please see the SQL & SSMS Installation tab. Note: if you already have MS SQL Server installed, you can use your existing SQL Server and connect Scan2x to it.
Click Save and a modal will appear showing the Scan2xOnline database has been created, and then click Next.
If there already is a Scan2xOnline database existing, the installer will notify you and will give you the choice whether to move forward with the existing Scan2xOnline database or choose a different database name.
.png)
For e.g., New Scan2xOnline database created.
.png)
For e.g., Connecting to an already existing Scan2xOnline database.
.png)
.png)
IIS Features
If IIS in not installed, press the Install IIS button. Once this has finished, click Next.
If IIS is already installed, click Next.
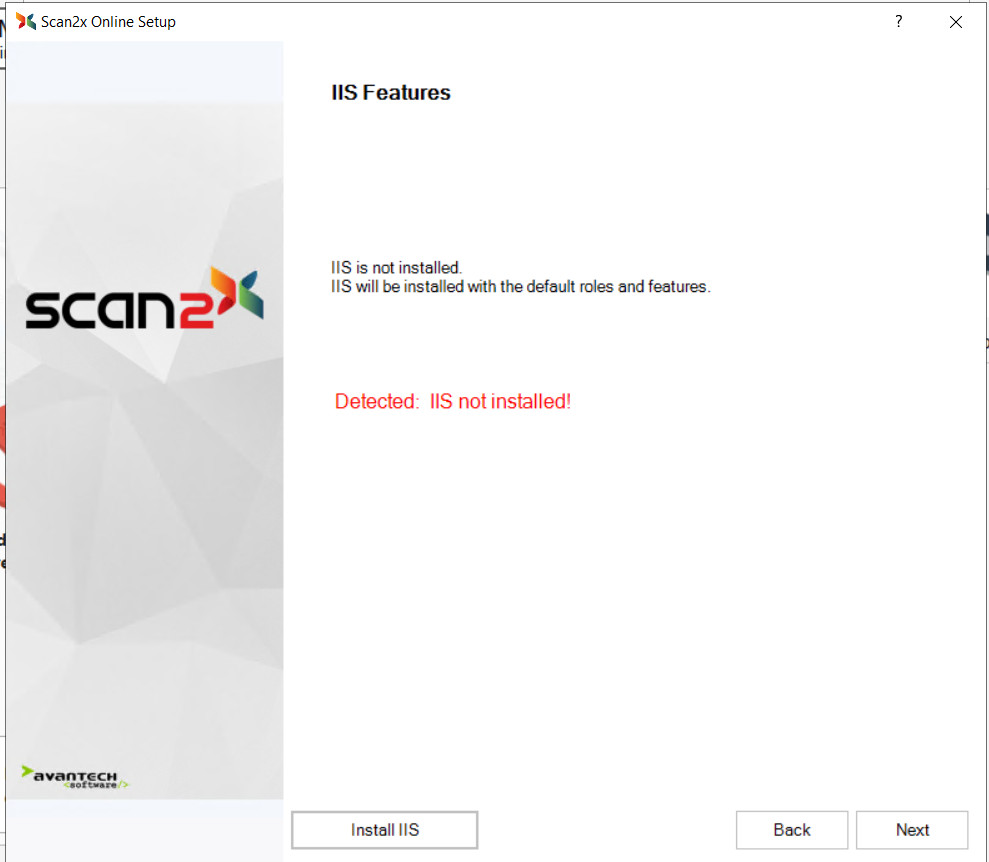
For e.g., IIS already installed
.png)
Web Access Servers
There are three sections in the Web Access Servers tab: Scan Web Server, Scan2x Web API, and Scan Web Socket Server.
1. Scan Web Server
•Website Source is where the files are copied from.
•Website Path - Scan Web Server default installation path is: C:\inetpub\wwwroot\ScanWebServer.
•Website Name - The default name of the Website is ScanWebServer.
•Port Number - the default port number is 9009.
•Idle Timeout is set at 20 minutes. If you wish the server never times out, set the value to 0.
•Max File Size (MB) is set to 100MB by default. The max limit this can be set to is 2000MB.
.png)
2. Scan Web API
•Website Source is where the files are copied from.
•Website Path - Scan Web API default installation path is: C:\inetpub\wwwroot\
•Website Name - The default name of the Website is ScanOnlineAPI.
•Port Number - the default port number is 9001.
•Idle Timeout is set at 20 minutes. If you wish the API never times out, set the value to 0.
.png)
3. Scan Web Socket Server
•Website Source is where the files are copied from.
•Website Path - Scan Web Socket Server default installation path is: C:\inetpub\wwwroot\
•Website Name - The default name of the Website is ScanWebSocketServer.
•Port Number - the default port number is 9002.
•Idle Timeout is set at 20 minutes. If you wish the ScanWebSocketServer never times out, set the value to 0.
.png)
From the Application Pool section, the default application pool uses a specific user’s credentials. Tick the Specific User option and insert the user account credentials (It is preferred that it is an elevated administrator account of the machine/PC) and click Test Credentials. Once the user authentication is successful, click the Install Servers button.
Once installed, click Next.
.png)
.png)
Scan2x Online Processor Engines
Folder Source - this is the default source where the files for the Scan2xOnlineProcConsole will be installed.
Folder Path - this is the default path that Scan2x automatically creates where the Scan2x Online Processors will be installed.
Number of Procs to be installed (Processing, Saving, Total) - this section displays the amount of processors allowed for your specific licence. The processors could be split accordingly to two types of processors; for processing or saving. The total then displays the amount of processors being used.
Settings Configuration
•Enable Timer - Enables the timer that takes into account the delay set between cycles.
•Restart Processors - Whether or not to restart the proc after n (n being the restart proc count) cycles. Usually used to release the memory usage.
•Large Doc Priority - Larger documents (with a bigger size) can be given priority as opposed to smaller sized files/documents.
•Time Delay (in seconds) - The delay between any cycle in milliseconds.
•Restart Proc Count - Number of cycles before restart the proc. Usually used to release the memory usage.
•File Size Max KB - This is the maximum file size that can be uploaded.
•File Size Min KB - This is the minimum file size that can be uploaded.
•Start Inactivity Check After - The number of minutes after which the Processor Engines start checking whether something has gone wrong whilst processing or saving a document.
•Inactivity Timeout Per Page - The inactivity timeout per page, that is calculated and taken into consideration after the "Start inactivity check". After this time (and the "Start inactivity check" time) elapses, the processing / saving action is timed out, indicating a problem with the action.
•Max Total Retry Count - How many times to retry restarting Procs.
•Retry After (in mins) - How long should it take to retry restarting the Procs.
•Max Metadata Thread Limit - This is the number of threads that can concurrently (simultaneously be used), we suggest the use of 4. However, if the client has a powerful machine that can withstand more, they can make it higher. If they make use of more than 4 without them having a powerful computer that can handle this, it will be detrimental to performance.
Click Install. Once complete, click Next.
.png)
.png)
New Scan Web Client
Website Source is where the files are copied from.
Website Path - default installation path is: C:\inetpub\wwwroot\.
Website Name - The default name of the Website is Scan2xAngular
Port Number - the default port number is 4200.
For Scan2x Hybrid - Important Note
In order for the online queue in the new Scan2x Onilne interface to work and be accessible, the default URL used - http://localhost:4200 - is listed within the Azure Portal. It is recommended that clients use that port and specific URL to host the new Scan2x Online site on. If you would like to use https, or change the port or change the site name, for e.g., https://scan2x:8080, you will need to inform us by email (support@avantech.com.mt) in order to add the new URL accordingly.
Idle Timeout (Minutes) is set at 20 minutes. If you wish the Scan2xAngular never times out, set the value to 0.
In the Application Pool section, select the option 'Same as Server?'. The application Pool will use the user credentials from the Web Access Servers Settings.
Click the Install New Client button. If a pop up appears asking if you want to use the same port, select Yes.
Once it has finished installing, click Next.
.png)
.png)
Classic Scan Web Client
Website Source is where the files are copied from.
Website Path - default installation path is: C:\inetpub\wwwroot\
Website Name - The default name of the Website is ScanWebClient
Port Number - the default port number is 80.
Web Server URL - this is the default URL of the Web Server.
Note
If the Port for Scan Web Server is changed, so should the ‘Web Server URL’ value in the Classic Scan Web Client tab. Near the Web Server URL section, instead of the numbers for e.g., '10.3.0.4:', replace the IP address with the term "localhost" in the scenario that the IP address is dynamic for this machine.
In the Application Pool section, select the option 'Same as Server'. The application Pool will use the user credentials from the Web Access Servers Settings.
Click Install New Client button.
If a pop up appears asking if you want to use the same port, select Yes.
Once it has finished installing, click Next.
.png)
Active Directory Authentication
Kindly skip the following tab by clicking the Next button.
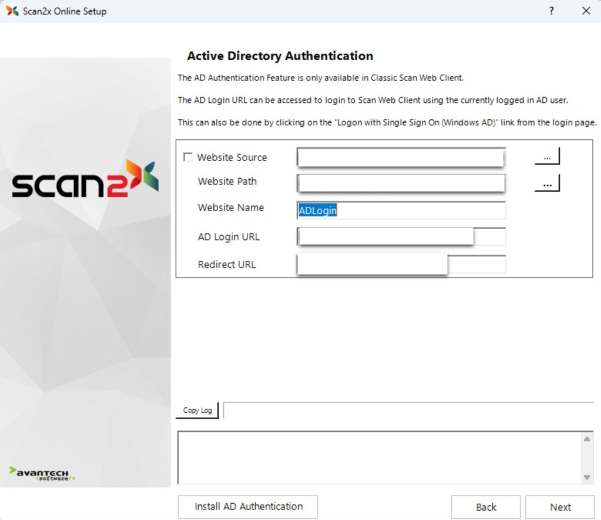
In here, the user is able to edit the port, domain etc. accordingly. Click Install AD Authentication to install this feature.
Scan2x Online Settings
Optional Settings - There are three sections for settings – Client Settings, ScanWebServer Settings, and Logging Options
•Client Settings - Auto Login Username can be set to “ADMIN” and the client will automatically log you in as Admin inside the client website.
•ScanWebServer Settings - User Notifications is not checked by default during the installation – this is an optional setting to have the system send user queue notifications to the users on the environment.
•Logging options - these are set as default to Error and Warning. It is also possible to set logging verbosity to Info and Debug modes. These modes are only to be used for troubleshooting.
If any of the above settings are enabled/changed, once finished, click Apply Settings.
Click Next.
.png)
Completed
Once the installation has been completed, you can click Finish.
Once the installation is complete, if none of the above settings were changed, the default sites that are created and which will be used by admins/users are as follows:
•Scan2x Web Server - http://localhost:9009/
•Scan2x Online Classic - http://localhost/ or http://localhost:80/
•Scan2x Online New - http://localhost:4200/
The following default sites are also created to support the setup (if none of the above settings were changed):
•ScanOnlineAPI - http://localhost:9001/index.html
•ScanWebSocketServer - http://localhost:9002/
.png)
The following issues will hinder the installation and prompt an error message box to appear accordingly, however the set up will assist you in solving these issues.
• The selected port/s is already in use.
• The selected server name/s is already in use.
• The chosen “Specific User” on both client and server has invalid credentials.
|