|
General Settings Tab
The General Settings tab contains the settings that control how Scan2x shuts down, logs out, updates and displays documents, as well as PIN login, queue email notifications and hybrid queue synchronisation.
Note: Power Off Action, Auto Power Off at and Allow use of ‘Import from existing PDF’ functionality are not used when configuring web, ScanFront 400 and MFD environments.
Note: Check for Updates on Startup, Auto Update and Allow updates by Admins only apply to Scan2x Windows and Scan2x Web environments only. They are ignored for any environment connected to a Scan2x Online Cloud tenant.
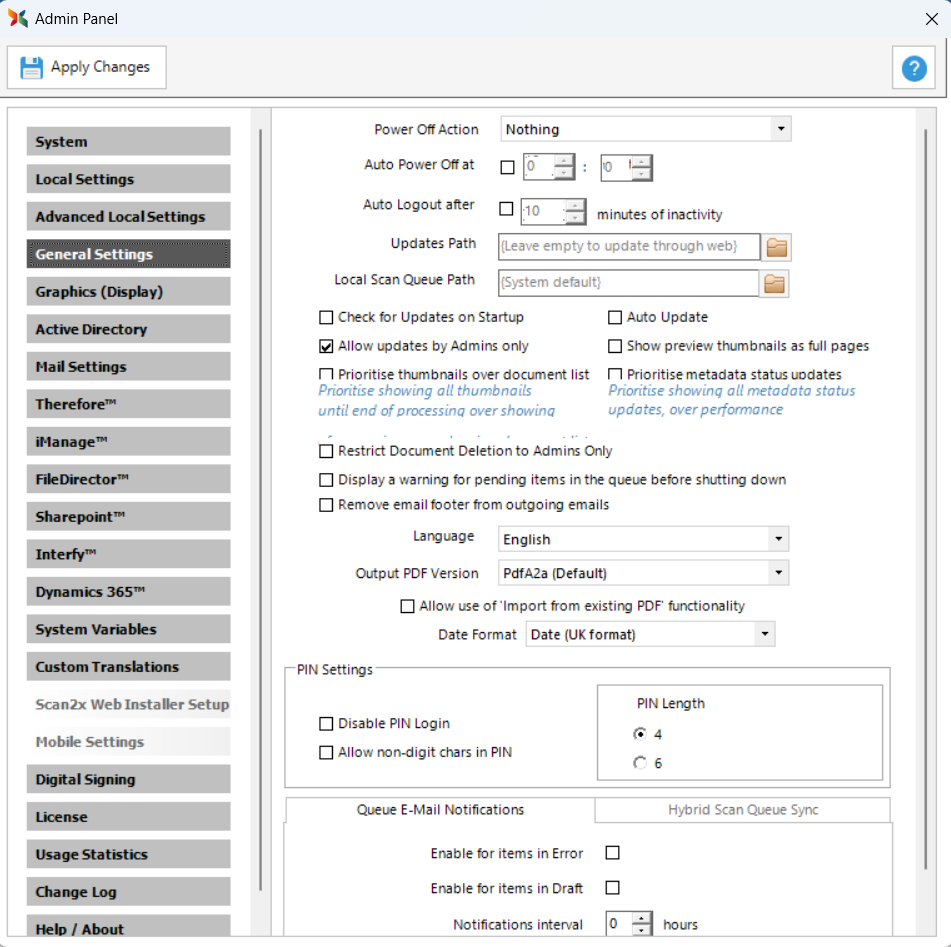
Power and Logout
Power Off Action
Sets what the POWER OFF button at the bottom left of the main Scan2x screen does. Select one of the following options:
•Nothing: Scan2x shuts down and returns the computer to the operating system.
•Shutdown: Scan2x closes and starts shutting down the operating system.
•Restart: Scan2x closes and restarts the operating system.
•Sign Out: Scan2x signs out the logged in user.
Any jobs that remain in the output queue at shutdown are retained and continue to be processed when Scan2x is started again.
Auto Power Off at
Shuts down the operating system at the time entered. To use this setting, select the checkbox and enter the time.
If Scan2x is in use when the shutdown starts, the user sees a warning with the option to postpone the shutdown. After a postponement, Scan2x prompts the user again every 10 minutes, each time with the option to postpone. If the user does not postpone, Scan2x closes and shuts down the operating system.
Any jobs that remain in the output queue at shutdown are retained and continue to be processed when Scan2x is started again.
Auto Logout after
Logs out an authenticated user automatically after a set number of minutes of inactivity and returns Scan2x to the login screen. To use this setting, select the checkbox and enter the number of minutes.
Any jobs in the output queue continue to be processed in the background.
The Keep system logged in after initial log in setting on the Local Settings tab disables this countdown.
Updates
Scan2x normally updates directly from the Internet when it starts, or when the user clicks Check for Updates at the bottom left of the main Scan2x screen. This does not work where the Scan2x computers on the network have no Internet access.
Updates Path
Enter the path of a shared folder to let Scan2x pull updates from that folder instead of the Internet. Leave the field empty to update through the web.
Network administrators populate the shared folder with the latest Scan2x update, in agreement with Avantech Software. Scan2x then updates from this folder.
Updating an Offline Scan2x
An offline Scan2x needs a custom update compiled by Avantech Software. To request one:
•Download SCLFileListBuilder.exe and place it in the Scan2x folder.
•Run SCLFileListBuilder.exe on the offline computer to generate a file that lists the files the computer currently has.
•Send the generated file to Avantech Software. Avantech Software compiles a custom update.
•Place the update in the shared folder entered in Updates Path.
Update Options
Check for Updates on Startup: Checks for later versions each time Scan2x Windows is opened.
Auto Update: Checks for later versions periodically. If Scan2x is installed on a network without Internet access, it checks the Updates Path. If it finds files that are more recent than those on the Scan2x computer, it downloads them and updates automatically.
Allow updates by Admins only: When selected, Scan2x updates only when a user with Administrator privileges is logged in. Users who are not Admins cannot pull a software update.
Local Scan Queue Path
Enter the path of a folder on the local device to store the documents that are scanned to the local scan queue. The documents appear in the local scan queue and are also present in this folder. If the field is left empty, the system default is used.
Interface and Document Handling
•Show preview thumbnails as full pages: Displays thumbnail previews as full page images to make visual identification easier.
•Prioritise thumbnails over document list: Shows thumbnails first, placing the visual previews above the text based document list.
•Prioritise metadata status updates: Shows the status updates for documents in Scan Preview above the thumbnails.
•Restrict Document Deletion to Admins Only: Removes the delete option for users who are not Admins. Only Admins can delete documents in the Scan Queue or Scan Preview.
•Display a warning for pending items in the queue before shutting down: Displays a message when Scan2x is shut down while items are still pending in the queue.
•Remove email footer from outgoing emails: Removes the footer from email outputs.
Language, PDF and Date Settings
•Language: Sets the default interface language. This does not override the language that each user selects in their own User Settings.
•Output PDF Version: Sets the default output PDF version as a global setting. The default is PdfA2a.
•Date Format: Sets the date format used by Scan2x.
•Allow use of ‘Import from existing PDF’ functionality: Enables or disables, globally, the use of PDF documents as input instead of documents that originate from scanners. Individual job buttons can also be set to allow or disallow PDF importing.
PIN Settings
Use these settings to control how users log in with a PIN.
•Disable PIN Login: Available when the system runs in Online Mode or uses Active Directory. Disables PIN login so that users sign in with their Active Directory credentials only.
•PIN Length: Select 4 or 6 characters for systems that use PINs.
•Allow non-digit chars in PIN: Allows PINs to include letters and special characters as well as numbers.
PIN Rules
To prevent weak PINs, Scan2x blocks simple sequences such as “123” or “abc”, and no character may repeat more than twice. If a user’s existing PIN does not meet these rules, Scan2x emails the user a temporary PIN and prompts the user to set a new PIN at the next login. Scan2x validates the new PIN before saving it. For example, an existing PIN of “1234” is rejected. The user receives a temporary PIN and is then asked to create a stronger PIN, such as “1a2b” or “A1b!C2”.
Queue E-Mail Notifications
These settings control the emails that the Scan2x transmission queue sends when a completed scan cannot be sent to its destination. This can happen for the following reasons:
•Scan2x cannot reach the destination, because of a permissions issue or a network outage.
•Scan2x cannot retrieve database query or web service query fields while draft scans are in the queue.
Configure the following:
•Enable for items in Error: Users receive an email from Scan2x for any scan that causes an error during transmission to its destination.
•Enable for items in Draft: Users receive an email when a scan remains unprocessed because a web service or database query failed. Scan2x saves these scans as drafts and periodically tries to reprocess the queries. While the scans remain in the queue, users are notified that the queries have not yet processed successfully.
•Notifications interval: The time, in hours, that the queue waits between notification emails.
•Only send notifications: The time interval during which Scan2x notifies users by email of items in the queue that may need attention.
Hybrid Scan Queue Sync
Hybrid Scan Queue Sync lets users scan documents with Scan2x Windows and then upload them to Scan2x Online or the online web queue for processing, saving, or both.
Note: The Webserver URL on the Local Settings tab must be filled in for this tab to be accessible.
•Upload Pre Processing: Scan2x Windows captures the scan, by USB scanning or File Import, and queues the documents for upload to Scan2x Online. Scan2x Online then processes the documents.
For the other three options, processing happens locally in Scan2x Windows. The options differ in how the sync is triggered.
•Allow Manual Sync: Each scan must be synced manually from the queue.
•Automatic Sync: Syncs scans from the queue automatically after the number of minutes entered in delay by. Enter 0 for immediate upload.
•Automatic Daily Sync: Syncs any scans left in the queue automatically at the time entered in at, every day.
Syncing a Scan Manually
When Allow Manual Sync is enabled:
1.Open the scan in Scan Preview.
2.Select Save in Queue as Draft.
3.In the queue, select the scan and click Sync Selected.

|

